How to create an entity?
In this article, you'll learn how to upload a database so you can use it later with an intent.
Using "Entities" in your bot allows you to create parameters for custom validations. In other words, you can upload a database into Botmaker to streamline the information confirmation process! To find this feature on the platform, go to: Menu > Chatbots > Entities (https://go.botmaker.com/#/entities).

After this step, you'll be able to add your database. Click the + button, located in the bottom right corner.

A box will open where you'll add the file name. We recommend that this name be the same one you plan to use in the variable creation field, so that organization is easier.

Important information: File extension: .xlsx
HOW DO YOU CREATE YOUR DATABASE?
- It must be created in Excel or Google Sheets.
- Only the first column of the spreadsheet will be used (Example: Column A).
- The first row should contain the name of the variable you'll use in your workflow.
In this example, we'll upload a database with people's names and use it to validate whether the user accessing the channel is registered in the database. If they aren't, they'll be redirected to a flow different from the main one.
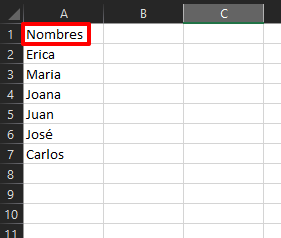
Once you've finished creating your database, download the file. Remember it must be in xlsx format. Then, upload the file to the Botmaker platform.

Once this process is complete, the database will be saved in the Entities tab.

HOW DO YOU USE THIS DATABASE WITHIN THE BOT'S FLOW DIAGRAM?
You need to use a Form (question action) to request the desired response. Then, you need to query the database and check whether the information is found in the spreadsheet, so you can configure the flow based on the data found in the registered database.
In the following example, we'll check whether the user's name is part of the database we uploaded in the Entities tab. If it isn't in the database, we won't allow them to continue with the main flow.
After creating the question, follow these steps: 1. The valid response type is: select the "Custom Entities" option.

- Entity name is: select the database in which you want to perform the search.

- User responses: you can create the variable in which you want to save this data. In this case, we use the standard variable "Name".

- Accuracy level: You can increase or decrease the search accuracy level for the data.

- Invalid responses: If the data isn't found in the database, you can provide a response to the user that allows them to try entering the information again before continuing with the flow for when the data isn't found.

After the response and validation, if the name exists in the database, the bot sends a welcome message, personalizing the text with the customer's name. To do this, we use the "Name" variable in the text, since it contains the user's name data located in Entities.

Here you can see the flow working according to the customer's responses. Found in the database:

Not found in the database:

HOW DO YOU CONNECT A GOOGLE SHEETS SPREADSHEET?
Connecting a Google Sheets spreadsheet to an Entity within the Botmaker platform allows you to streamline the modification/alteration of Entity fields.
To do this, follow these steps:
- Step 1: In Google Sheets, go to the Extensions option, select Apps Script "Script Editor."

Step 2: Copy the following code into the Google Sheets script screen.
var API_ACCESS_TOKEN = 'YOUR_API_TOKEN';function onOpen() { SpreadsheetApp.getUi() .createMenu('Botmaker') .addItem('Send data to bot', 'updateData') .addToUi();}function updateData() { var sheet = SpreadsheetApp.getActive().getActiveSheet(); var range = sheet.getDataRange(); var headers = getColumns(range); var rows = range.getNumRows(); var content = []; for ( var r = 2 ; r <= rows ; r++ ) { var item = {}; content.push(item); for ( var c = 0 ; c < headers.length ; c++ ) { var header = headers[c]; var value = range.getCell(r, c + 1).getDisplayValue().toString().trim(); item[header] = value; } } var options = { method: "post", contentType: "application/json", headers: { "access-token" : API_ACCESS_TOKEN }, payload: JSON.stringify({name: sheet.getParent().getName(), items: content}) }; var postResult = UrlFetchApp.fetch('https://go.botmaker.com/api/v1.0/spreadSheets/updateBotEntityFromGoogleSpreadSheets', options); SpreadsheetApp.getUi().alert(postResult.getResponseCode() == 200 ? "Operation Successfully Completed" : "Problems: " + postResult.getContentText());}function getColumns(range) { var maxColumns = range.getNumColumns(); var result = []; for ( var c = 1 ; c <= maxColumns ; c++ ) { var v = range.getCell(1, c).getDisplayValue().toString().trim(); result.push(v); } return result;}

- Step 3: Replace the "YOUR_API_TOKEN" code with the Bot's access token. You can find this under Settings > Integrations > Botmaker API > Credentials > Access Token. Don't forget to save the script.

- Step 4: When you update the Google Sheets spreadsheet, a new "Botmaker" button will appear with a "Send data to bot" option. The first time you click "Send data to bot," Google will ask you for permissions that you need to grant.
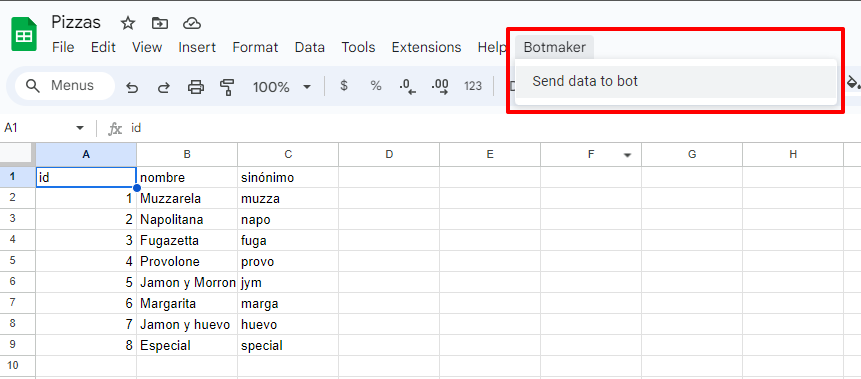

- Step 5: Click "Send data to Bot" again, and the record will be generated within the platform.
All done!
Remember to visit our Help Center for further information.
Botmaker Team