AI Agents: create an agent and configure its Profile, Funnel, Knowledge, Tools, and Automations
In this article you'll learn what an AI Agent is, how to create one step by step, how to write the description the orchestrator uses to route conversations, and how to go through its tabs: Profile, Funnel, Knowledge, Tools (skills), and Automations.
An AI Agent is a unit specialized in resolving a type of task or query within your project (for example, booking an appointment, answering billing questions, or qualifying a lead). In Botmaker 3.0, agents are the orchestrator's "tools": it receives the conversation with the user and asks each agent to resolve what it's an expert in. The agent doesn't talk to the user directly; it runs its process (its Funnel) and returns the result to the orchestrator, which is the one that responds.
You can:
- Create, edit, and delete AI Agents.
- Define the description (activation) that states when each agent should be used.
- Design the agent's process in its Funnel.
- Connect Knowledge and Tools (skills).
- Configure Automations, test it, and publish it.
- Reuse the same agent across several orchestrators.
Key concepts
AI Agent: a specialized unit that resolves a specific task. It's one of the tools the orchestrator can use.
Description (activation): a short, natural-language phrase that states when the agent should be used. It's what the orchestrator reads to route.
Funnel: the agent's process, made up of states (the steps it follows to meet its goal). It used to be called "workflow".
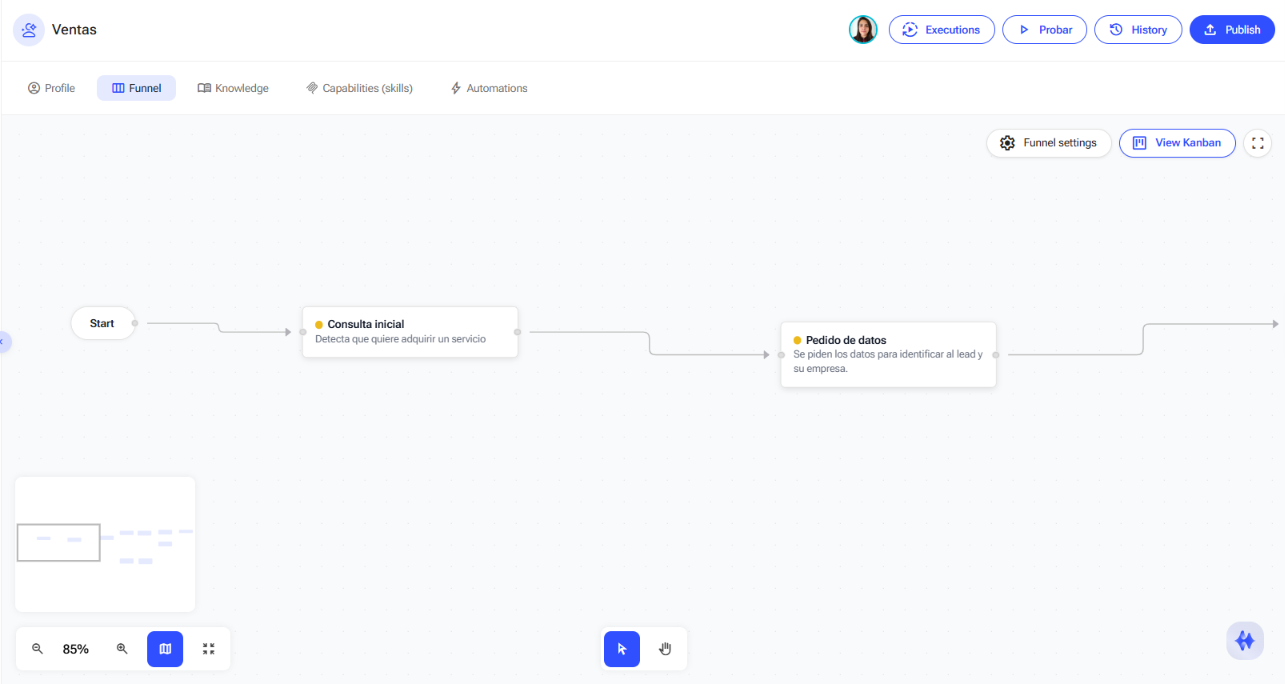
Agent tabs: when you open an agent you'll see, at the top, the sections Profile, Funnel, Knowledge, Tools (skills), and Automations. In the top right are the Executions, Test, History, and Publish buttons.
How to create an AI Agent
Step 1: Create the agent
In the left side menu, under AI Agents, click the + button. Give it a name that represents the task it will resolve (for example, "Sales" or "Customer follow-up").

Step 2: Fill in the Profile and the description (activation)
In the Profile tab, review the name and write the description (activation): the phrase the orchestrator reads to decide when to use this agent. Write it in natural language and concisely (ideally 10 to 15 words). For example: "use this agent when the user wants to book an appointment at the clinic".

Note: you don't need to write technical rules. With a clear description, the orchestrator figures out on its own when to use the agent; the more natural the wording, the better.
Step 3: Design the process in the Funnel
Open the Funnel tab. There you build the agent's process with states (the steps), from "Start" onward. For details on how to add and configure each state, see the Funnel article.
Step 4: Load the Knowledge
In the Knowledge tab, connect the knowledge bases the agent can consult to answer with your content.

Step 5: Add Tools (skills)
In the Tools (skills) tab you connect the integrations, the MCPs, and the logics the agent can use within its process.

Step 6: Configure Automations (optional)
In the Automations tab you can trigger actions by time or by state changes.

Step 7: Assign, test, and publish it
Assign the agent to an orchestrator from the orchestrator's AGENTS column. Use the Test button to verify its behavior and, when it's ready, the Publish button to put it into production. In History you review previous versions, and in Executions, the conversations.

Remember to visit our Help Center for further information.